MVC – ASP. NET

The following topics are covered in this article:

  1. M-V-C
  2. How a request is processed?
  3. Folder Structure and Naming Conventions
  4. Why MVC?

M-V-C

MVC is Model-View-Controller, a design pattern used in web development. If you are familiar with Web Forms in ASP.NET, you may trace back a few concepts in here with what you already know and if you are not, then let’s see what MVC is. Unlike Web Forms which has the aspx and aspx.cs file with server controls and code-behind concepts, here in MVC everything circles around classes and HTML. No server-side controls or no drag and drop of controls are possible in the MVC world.

Controller

The controller is a class which holds the action methods. It mainly controls the flow of the application. The controller does the processing of the request made by the user by making the database calls or do any other ‘job’ to process the user’s request and returns the view. The controllers should be inherited from the ‘Controller’ class.

An example of the controller is as follows:

Controller

Here Index() is the action method defined in the Speaker controller. The return type should be ActionResult or any classes inherited from ActionResult. Possible other options include the following:

a. FileResult

b.JsonResult

c. ViewResult

Model

The model is a class which holds the data. The data is described as properties in Models.

ModelClassno

In the above Speaker model, SpeakerId and Name are the properties defined.

The model can also hold some optional attributes which act as decorations to the data for validation. These attributes are called Data Annotations. The data annotations handle the client side as well as server-side validation without writing any additional code.

Fotor_150601377685191

Model with Data Annotations

In the above sample code, [Required] is the attribute that specifies that the value is required for the properties Name and Description. Hence the required field validator is implemented by the data annotation [Required] without any extra coding.

View

The view is the HTML content which will be shown to the user. When a request is processed, the view is returned by the controller.

How the request is served?
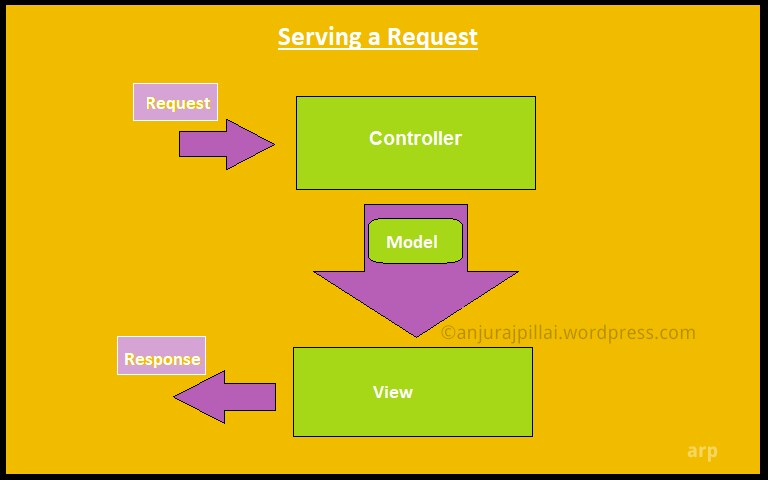
Fotor_150591210368372

In the case of MVC application when a URL is requested by the user, the Global.ascx file with the help of the class RouteConfig.cs executes the corresponding action results in the controller. In fact, when a web request happens a method in the controller class is called. The Controller ‘does something’ and sends the Model (data) to the View (UI) and the response goes out to the user. Here the controller can either make a database call, do some other processing or anything it wants to and the result of which will be the data (Model) to be shown to the user (View). In fact, if there is no data to be sent to the view, it can just call the view without the Model. And it’s absolutely fine.

Consider the sample URL below:

http://mysite/Speaker/Index

Here, ‘Speaker’ is the controller name and ‘Index’ is the name of a method inside the SpeakerController.cs class.

So when the user requests this URL in the address bar of the browser, the action method ‘Index’ inside the SpeakerController.cs class is executed and a view with the name ‘Index’ which has the HTML content is returned back.

Routing

The routing rules are defined in the file RouteConfig.cs. When the request comes in, the Application_Start event in the Global.ascx file invokes the routing rules defined in the RouteConfig class. A default route will be defined in it and we may add more routes as and when needed. The RouteConfig.cs appears under the folder App_Start by default, but it is not mandatory for the file to be in that location itself for the application to run.

ROuteConfigFolder

RouteConfig.cs

The sample code which is in the RouteConfig.cs class is as follows:

public class RouteConfig
{
    public static void RegisterRoutes(RouteCollection routes)
    {
       routes.IgnoreRoute("{resource}.axd/{*pathInfo}");

       routes.MapRoute(
              name: "Default",
              url: "{controller}/{action}/{id}",
              defaults: new { controller = "Home", action = "Index", id = UrlParameter.Optional }
        ); 
    }
}

The line url: “{controller}/{action}/{id}” specifies the pattern of the url. Here id is the optional parameter passed to the action.

defaults: new { controller = “Home”, action = “Index”, id = UrlParameter.Optional } :This specifies the default controller and action name.

Folder Structure and Naming Conventions

For MVC to work properly, one has to follow a handful of naming conventions and folder structures.

Controllers: The controllers are to be placed inside the ‘Controller’ folder. All the controllers are to be named ‘Controller’ after the actual name. If you need to create a Home controller, then it should be named HomeController.cs.

Fotor_150600816358070

Controllers Folder Structure

View: All the views reside in the ‘Views’ folder. For the application to work correctly, inside the ‘Views’ folder, there should be a folder with the name of the controller, and the view with the name of the action method defined in the controller should be there in this folder.

If we have an action ‘Index’ inside the SpeakerController, then corresponding to that, there should be a view with the name Index.cshtml (for C#. For VB, it is Index.vbhtml) inside the folder Speaker of the Views folder.

Fotor_150600790070440

Views Folder Structure

Model: In the case of the model, it’s NOT mandatory to have the model inside the model folder or even inside the application. The model can be placed anywhere in the application or if you would like to use models from an external source, that is also possible. Having said that, normally if the models are in the same application itself then it is preferable to have them inside the Model folder in so that everything will be in an organized fashion.

Why MVC?

The biggest advantage of MVC over Web Forms is the separation of concern. In the case of Web Forms, the controls in the page and the code on which it executes are tightly coupled. If there is a button Button1 on the aspx page, there is an event Button1_OnClicked in the aspx.cs file which is tightly coupled to the button click. In the case of MVC, the UI, and the business logic is separated and is defined across the Model, View, and Controller and hence the dependency is minimized.

Another advantage of MVC is testability. Since the controller is a class, every method in that is unit testable unlike the case of web forms. It enhances the application in the long run in such a way that if there is any change in any of the code in the future, it can be unit tested which saves time and energy.

Hope to see you soon on another topic! Happy coding!


SharePoint 2013: Common Development Issues and Solutions

The most prominent feature of SharePoint 2013 when compared to its predecessor SharePoint 2010 is the app model of development. In app model, there is the flexibility of creating and designing pages where one can define the functionality in the .NET language which will behave the same as any other .NET application during development. There will be an app project as well as a web application project. The web application contains the aspx pages , scripts, styles etc for the app to function which is similar to any other web application where as app project will contain the configurations for app. And yes, you can use client-side code instead of C#. But as a .NET programmer I prefer the .NET coding for that.

You will be defining the far and wide of your page based on your requirements. If you are familiar with the web application model of .NET, you won half the battle. You could define the hierarchy of folders and pages in your application without any constraints imposed by SharePoint. Once the functionality is finished and tested, the app can be added to the app catalog and the web application can be published to a hosting environment.
It behaves the same as any other app where one can install it when he needs it and uninstall it completely when he does not need it any longer.

Here I would like to deal with some of the issues which I have faced during the development of my very first app model project in SharePoint 2013 and the solutions to those problems. I hope they would be helpful for the beginners in trouble.

Most of the issues are due to the lack of necessary privileges in the SharePoint Databases for the user account which is being used to create and run the application.

Issue 1:

Error occurred in deployment step ‘Install app for SharePoint’: The System Account cannot perform this action.

Solution:
You cannot use the System Account to create and run the application. For that another account is required. Create a new account under the domain and give admin privileges.


Issue 2:
SharePoint Addin The local SharePoint server is not available. Check that the server is running and connected to the SharePoint farm

Solution:
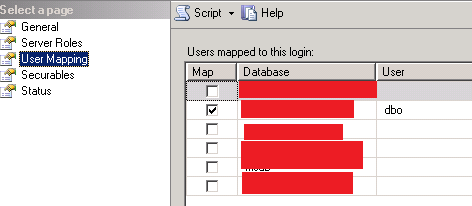
Give owner permission to the SharePoint database for the user account from SQL as follows:
From the SQL Server Management Studio
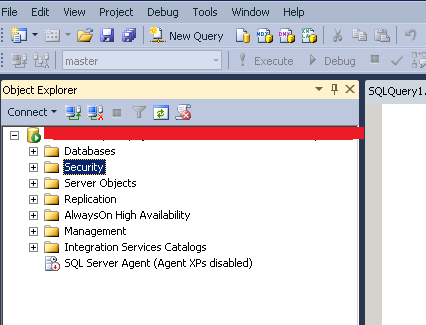
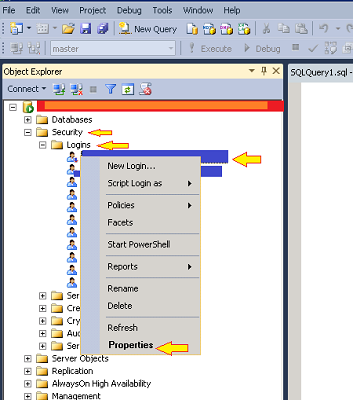
Security -> Login sub menu -> User Account-> Properties-> User Mapping-> select your SharePoint database and give owner permission to the account
Refer the steps described below if you are not aware of how to give permission.

Step 1:

1


Step 2:

2_orig_1


Step 3:

3

Issue 3:
Cannot connect to the SharePoint site:
Make sure that this is a valid URL and the SharePoint site is running on the local computer.
If you moved this project to a new computer or if the URL of the SharePoint site has changed since you created the project, update the Site URL property of the project

Solution:
Give owner permission to the SharePoint database WWS_COntent and AppMng_Service_DB


Issue 4:
‘Install SharePoint Add-in’: We’re sorry, we weren’t able to complete the operation, please try again in a few minutes. If you see this message repeatedly, contact your administrator.

Solution:
Give owner permission to databases start with ‘AppMng_Service_DB_’ and ‘App_Management_’ for the user account.

After deployment you may get the following errors:

Issue 5:
Web page not available:
Solution:
Check the certificate path and the name is correct. Confirm that the extension “.pfx” is there for the certificate in the web.config of the deployed site.


Issue 6:
HTTP 401.2 -Unauthorized: Logon Failed Due to Server Configuration with No Authentication

Solution:
To resolve this problem, enable at least one authentication method. To do this, follow these steps:
From the Start menu, point to Programs, point to Administrative Tools, and then click Internet Services Manager.
Under the Tree pane, browse to the desired Web site.
Right-click the Web site, and then click Properties.
On the Directory Security tab, under Anonymous access and authentication control, click Edit.
Select (and implement) at least one type of authentication method.


Issue 7:
Authentication failed/ 403 error

Solution:
Update the changed client Id in the web.config file of the web application as in VS and app.

Thanks for reading! Happy coding!

The BIGGER “Big Data”

We are living in a world, where the technology has evolved to an extend such that almost everything we come across or use  everyday is digitized. For example, we have an automated house hold equipment in our home which we can control by sitting in our office , we have smart phones , smart cards , we do a lot of on-line shopping, we use Twitter, Facebook, Linked in etc. Almost everything we do result in some kind of data generation now-a-days and the rate of data generation gets multiplied several times each year when compared to the year just before. Since the data is of different variety and huge , the traditional techniques which have been using is not so efficient to store and process this sort of data in a reasonable time. In short, the data grows too ‘BIG’ to big data.

BigData

What is Big Data?

“Big Data” can be considered as a kind of  explosive word now-a-days.  As the name says, “big” data is actually the data which is quite big. It consists of different varieties of data which are generated in a very high speed. In other words, big data is the large sets of structured or unstructured data which cannot  be processed by using traditional databases or techniques.

How data becomes Big Data?

In the earlier stages, the data was entered into the system by data entry professionals. Later, when internet and social networking became popular, people started generating data by their own in the form of images, videos and texts. The amount of data that is generated at this scenario is huge compared to the previous one. And now, devices are generating data in addition to the two other sources which cause the quantity of data even several times higher on each passing day. As per the statistics, the amount of data that will be generated by 2020 will be close to 45 zettabytes (1.0 × 1021 bytes) . The popularity of IoTs (Internet of Things ) contribute even more to the show.

Lets take social media as an example. We update status which is in the form of text, upload images or videos on Facebook, or Twitter. The data which is in different formats get into the scene. The amount of data get accumulated into their servers each minute is massive.  For perspective, the pieces of content that gets shared in Facebook in a day is is almost 1 billion.

We do smart card shopping. Our smart card company will store the data of the shops from which we make purchases.  The shops may store the details of items which we purchase. When we do an on-line shopping, we will be able to get a list of item which we have viewed so far and there will be another list of suggested items, which are the items purchased by the people who has bought the same item as we did. The on-line retailers  are storing each and every click happening on their site, not only the purchases.

Sources of Big Data

1. Smart phones

2. IoT

3. Satellites

4. Social networking

5. Online shopping

6. Sensors

Characteristics of Big Data

The main characteristics of big data is said to be as follows which can be depicted by 3’V’s. Volume, Velocity, Variety.

Volume: Volume defines the amount of data . The data generated is in huge volume. The volume of data that is produced now is more than 50 times than that of 10 years back.

Variety: There are different varieties of data that gets generated which includes unstructured, semi structured and structured data. The data can be in the form of text, images, video, music or any other format. In short, there will be a large variety of data.

Velocity: The velocity or the speed in which the data is getting generated is very high.

There is another characteristic called Veracity which points to the uncertainty in the data that is being stored. The data which is stored and being analysed cannot be ensured to be solving the problem for which the analysis happens.

How to make use of Big Data?

Since huge amount of data is being generated and stored in their servers, the think tanks in big companies thought of making use of big data in their business. The data scientists started analysing the big data to find out some patterns or insights which is hidden in the data that enable  them to market their product or service much better which is called Big Data Analytics.  The big fishes like Facebook analysed the big data to give suggestions and recommendations to the users on their interest areas and started an advertising model which is quite a great success in their run.   The term widely known as ‘Predictive Analysis’ came into picture which make use of the data to analyse the trends and and predict the future growth.

Benefits of Big Data Analytics

1. Analysing big data helps in better decision making.

2. Big data analysis helps in targeted audience advertisement and improved marketing strategy. By analysing data, a firm can understand which group of people will help them to get their business to the next level so that they can market their product to a similar crowd to achieve better results.

3. The increase in customer base in turn increases the revenue of the company on big data analysis.

4. The analysis of data helps in the health care domain to predict and diagnose diseases in a much better manner.

Challenges in Big Data Analysis

The main challenges are as follows:

1. Since data is so huge, chances are there that the relevant information can be missed out during the analysis process.

2. Skilled Professionals who are efficient in analytic is not too easy to achieve.

3. Need of meeting speed has to be addressed since the result of analysis are being used in sectors like share markets where fluctuations happen so abruptly.

4. The quality of data being stored cannot be ensured always and hence the result of the analysis also gets affected by that.

Disadvantages of Big data

Since the data which gets entered in the internet is being used for the analysis purposes, the users cannot be specific in which all information of theirs  can be used for the same. The privacy of the users data cannot be always protected.

The big data revolution has begun and now lets wait and see what is happening.. 🙂

To the nature through “Camp Green Thumb”

CampGreenThumb

As the responsible citizens of the country we live in, its our duty to provide something good back to our society. Every year we used to have a community service from our company on account of that, as a noble gesture to give our share back to the community we live in. For the current year we had a very different programmme compared to the ones we had in the previous years. We decided to visit a government school and help them out to cultivate vegetables on a barren land they have procured for lease and the harvest of which will be used for the mid-day meals served to the students of the school. It was planned as a two day event scheduled for December 4th and 5th which was named “Camp Green Thumb 2015”. Most of us were doing something like this for the first time. We were so much excited about the event and started to plan for that even from the very beginning. The organizing committee members visited our prospective farmland. One of my colleague was so confident in our ability in farming that he was sure that we would complete the whole task before noon.  A day or two before the camp, we purchased the tools for us to do the work and which would be donated to the school after our camp. All of us were informed to reach the starting point of our journey at 7:15  in the  morning.

And finally the camp day arrived. We set out by 7:45 am and reached our destination by 8:30 am. Even at that early, there were students at school, though  their regular class hour start at 9:30. The head master of the school was a very cordial and a nice person. With a small meeting, our event started. The head master, principal of the school, PTA members, a retired agricultural officer and a faculty from Rajagiri college were there  for the meeting in addition to us. Since it is a government school in the interior of a village, with the limited funds available to them they try their best to become a good institution for the students to learn and develop. Also they received awards from several organizations for different programmes conducted.

By 10 am, with our anthem “We shall overcome…” we started the work. We divided ourselves into 3 teams, of which one team started to  clear out the weeds in a small area which is already being cultivated. A day or two before our camp, we arranged a JCB to plough the land since its too barren and hence there were small rocks in the ploughed land so that our second team started to remove those rocks off the field. The third team started to dig holes to plant the plantain trees. The agricultural officer  guided us and cleared our doubts in the cultivation. Then we started to plant the tapioca. By noon our work was almost over on planting the vegetables on the farmland and then we went to a stream nearby.

The organization committee of our company had arranged food for us. After lunch we spend some time together with the beautiful songs sung by our nightingales. We came back to the school after a while and started to make the grow bag. Our goal was to make 100 grow bags altogether in which the saplings of brinjal, tomato, ladies finger, chili are to be planted. During morning meeting we had, the agricultural officer had given us a detailed lecture on filling the grow bags. For the grow bags we have to mix soil, coconut husk and fertilizer in the ratio 5:1:1 and add some quantity of pseudomonas to save the plants from insects.  The mixing was quite a hard task and most of us had to take our turns to mix it up well to the consistency required. Then we have filled the mixture in the grow bags and planted the saplings which will be taken care by the students of the school from thereafter.

The people staying near to the school were very co-operative and kind to us. They ensured that we get enough water to keep ourselves from getting dehydrated in the intensity of the sun. They prepared a very tasty mixture of curd water with some spices for us in between and have cooked tapioca and chutney for us in the evening. By 6 we have finished with the task which we have undertaken for the day. After  getting fresh, we started with our entertainment programmes. After the DJ, we tried our hands at cooking grilled paneer and grilled chicken. Since our camping was at the school itself, we had to cope up with the limited facilities available there which was not very hard. We used the wash rooms of the school and we slept on floor of the staff rooms. But it did not seem as a big problem to any of us.

On the next day morning, after spending some time there, we left  from the school with a hand full of experience and a mind full of satisfaction. It was an awesome experience to work on the farm. We understood that its not an easy task to do the farming and we should really appreciate the effort of the farmers who spend their days in the sun and rain to cultivate the food for us. A big cheers to them!!!

Asp .Net Fileupload on partial postback

One of the requirements in my web project was to have the ability to upload image via a partial post-back and once the file upload is completed I needed to retrieve the saved url on the client side.  I knew this wont be an easy task,  but being an optimist 🙂 and a strong believer of  the saying, “Where there is a will, there is a way” I decided to try. I started with simple steps.

I placed the fileupload control and a button whose click event saves the file inside the update panel as we used to do and triggered the button click event on  ‘AsyncPostBackTrigger’ of update panel. My code was as follows:

aspx:

<asp:UpdatePanel ID="UpdatePanel1" runat="server" UpdateMode="Conditional" >
 <ContentTemplate>
 <asp:FileUpload ID="fileUpload" runat="server" ToolTip="Browse" />
 <asp:Button ID="btnUploadImage" runat="server" Text="Upload" OnClick="btnUploadImage_OnClick"/>
 </ContentTemplate>
 <Triggers>
 <asp:AsyncPostBackTrigger ControlID="btnUploadImage" EventName="Click" />
 </Triggers>
</asp:UpdatePanel>

Code behind:

protected void btnUploadImage_OnClick(object sender, EventArgs e)
{
 if(fileUpload.HasFile)
 {
    string filename = Path.GetFileName(fileUpload.FileName);
    string fileUploadPath = Path.Combine(Server.MapPath("~/Uploads"), fileName);
    FileUploadControl.SaveAs(fileUploadPath);
 }
}

When I ran the code and checked the property fileUpload.HasFile, it was returning  as false and the file was not getting saved.  I tried different options the result was the same. The next option in front of me was to search on internet to check if there was any related issue reported by someone else and the solution for that. From my search results, two things were clear for me. First thing I understood was that due to security reasons, the fileupload control does not support partial postback. The second one was that there were other people facing the same problem as I do (which was a sort of relief for me.. 😉 ) There were suggestions to make the uploading happen on full post back of the page even though the control is inside update panel by using “PostBackTrigger” instead of “AsyncPostBackTrigger” of the update panel. I experimented it and without any drama, the file got saved. But that was not what I was trying to achieve. Another suggestion was to place the below code in page load.

Page.Form.Attributes.Add("enctype", "multipart/form-data");

Neither did that work for “AsyncPostBackTrigger”.

Our first preference was to make it work using asp file upload control itself and so I didn’t consider any third party control. But by that time, I was almost sure that its not possible. Then I came to know about “AsyncFileUpload” control in AjaxControlToolkit which is also from Microsoft. I installed the AjaxControlToolkit in my project using Nuget Package Manager.

The AsyncFileUpload control has two server side events:

  • UploadedComplete – Fired on the server side when the file successfully uploaded
  • UploadedFileError – Fired on the server side when the uploaded file is corrupted

and three client side events:

  • OnClientUploadComplete – The client side event fired when the file is successfully uploaded
  • OnClientUploadError – The client side event fired when the file uploading failed
  • OnClientUploadStarted – The client side event fired on the file uploading starts

As the server event “UploadedComplete” fires when the file gets uploaded successfully, I removed the button whose click event had been used to save the file and placed the code for saving the file in “UploadedComplete” event. And finally it worked. The file got saved on partial postback. 🙂  My modified code is as follows:

aspx:

<ajaxToolkit:AsyncFileUpload ID="fileUpload" runat="server" OnUploadedComplete="fileUpload_UploadedComplete" />

Code behind:

protected void fileUpload_UploadedComplete(object sender, AjaxControlToolkit.AsyncFileUploadEventArgs e)
{
   if (fileUpload.HasFile)
   {
      string fileName = Path.GetFileName(e.FileName);
      string fileUploadPath = Path.Combine(Server.MapPath("~/Uploads"),  fileName);
      fileUpload.SaveAs(fileUploadPath);
   }
}

So the first step is successful. The next challenge was to get the url of the saved file in client side. To achieve that, my plan was to make use of the client side event “OnClientUploadComplete”. I found out the method, “get_fileName()” which returns the name of the uploaded file in the client side event. I felt relieved on seeing that the method returned me the name of the file I uploaded. But doing more testing I realized that if I renamed the file on the server, the get_fileName() was always returning the original file name instead of the renamed file name.  Also I needed to get the relative path of the saved file on to the client side. I tried I didnt see an option within the AjaxControl toolkit which would provide that information, and when I thought about it I realized that there is no way the control will know this information since the control wont know what I am doing with the file. So I had to try for other options.

I thought of other alternatives. I decided to set the url of the file  to a hidden field in the server side event “fileUpload_UploadedComplete” and access that in my client side method. I placed an asp hidden field in my aspx page and set its value to the url of the file  from the “fileUpload_UploadedComplete” event once the file gets saved . I appended the following piece of code to the “fileUpload_UploadedComplete” event.

    var url = Uploads+ "/" + fileName;
    HiddenField1.Value = url;

And when I tried to access the value of the hidden field in my client method, it was null.. 😦 The reason was that,  the server event “fileUpload_UploadedComplete” has been  fired on partial postback of the page. During partial postback, only a section of the page is being refreshed. In my context, only the AsyncFileUpload which is an ajax control has been send to the server and so the server event can’t update the hidden field control.  After spending some time on research and experimentation for an alternative, I decided to set the value of the hidden field using Javascript and registering the script from csharp . Hurray..! It worked fine.. 🙂

My resultant code is as follows:

aspx:

    <ajaxToolkit:AsyncFileUpload ID="fileUpload" runat="server" OnUploadedComplete="fileUpload_UploadedComplete" />
    <asp:HiddenField ID="hdnFileFolder" runat="server" />

Code behind:

protected void fileUpload_UploadedComplete(object sender, AjaxControlToolkit.AsyncFileUploadEventArgs e)
{
   if (fileUpload.HasFile)
   {
      string fileName = Path.GetFileName(e.FileName);
      string fileUploadPath = Path.Combine(Server.MapPath("~/Uploads"),  fileName);
      fileUpload.SaveAs(fileUploadPath);

      var url = "Uploads/" + fileName;
      ScriptManager.RegisterStartupScript(this, this.GetType(), "fileName",
            "top.$get(\"" + hdnFileFolder.ClientID + "\").value = '" + url + "';", true);
   }
}

I hope this post was helpful.. Thanks for reading..! 🙂