Set up Angular 2 in Visual Studio 2017

Angular is a platform that makes it easy to build an application in the web. Angular turns your template into codes that are highly optimized for Javascript. It quickly creates UI views with simple and powerful template syntax. Here we will be discussing on how to set up Angualr 2 in Visual Studio.

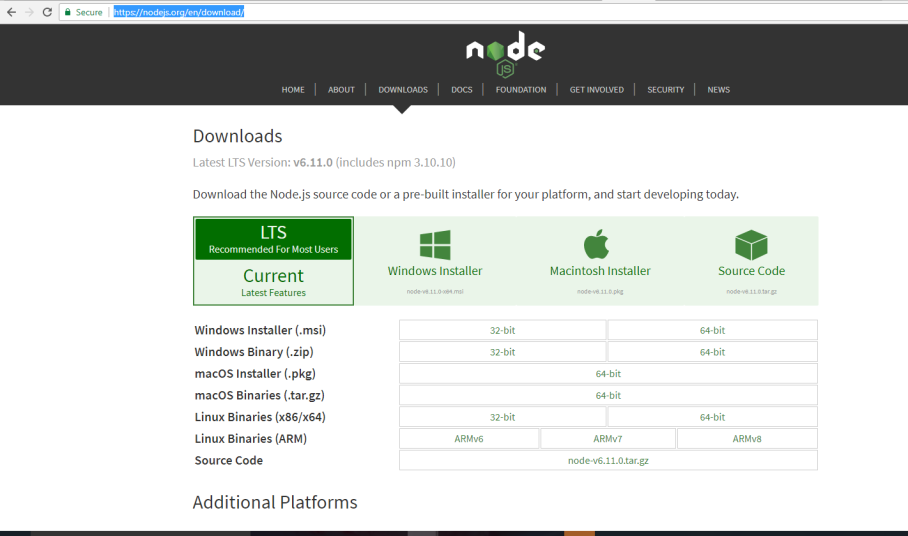
In order to install the Angular 2 the first thing we need is to install Node.js. This can be installed from the following link  https://nodejs.org/en/download/ .We can choose 32-bit or 64-bit according to our system configuration.

NodeJs.PNG

We can check if it is already installed checking the version of node.js in the command prompt.

NodeVersion.PNG

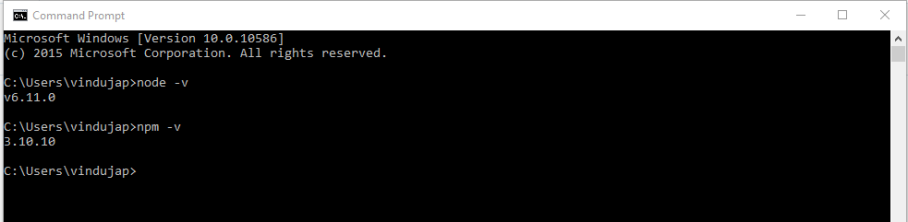
If it is not installed we will be getting an error message saying node is not recognized as an internal or external command. Next step is to create a new project in visual studio.Then we have to configure the environment settings for node and npm.ExternalTools.PNG

This tells Visual Studio to look for external tools (like npm) in the global path before the internal path.

The next thing we have to do is install typescript for visual studio. Typescript is designed for development of large applications and trans-compiles to JavaScript.

Now we have to download the Quick Start Files  from the Angular web site using the link below.
Angular QuickStart.PNG

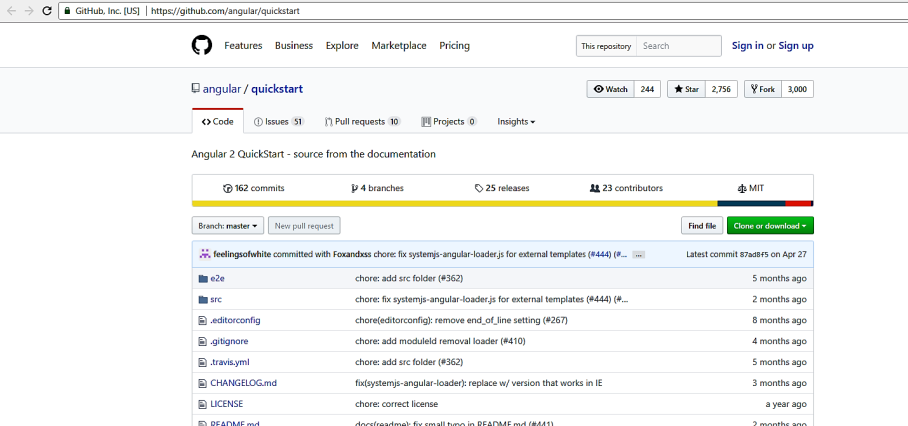
Extract the contents of the downloaded .ZIP folder. https://github.com/angular/quickstart

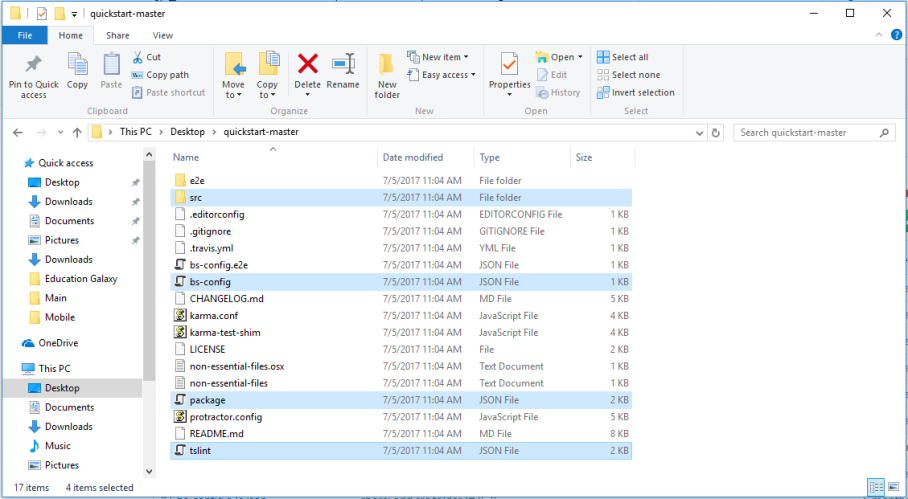
Copy the required files from the unzipped folder which includes

  • src
  • bs-config.json
  • package.json
  • tslint.json

SelectedFiles.PNG

Copy the above folders and files into the solution and include it in the project.Then we have to restore the packages. In order to do that we have to right click the package.json file and then click the Restore Packages

Restore Packages.PNG

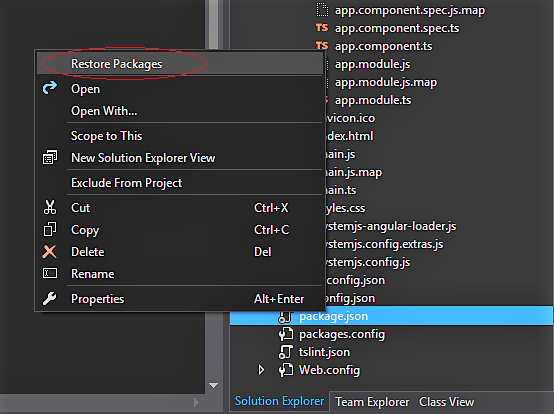
This will result in the installation of all the node_modules.You can check the output window to find out whether it has been restored correctly or not.

NodeModules.PNG

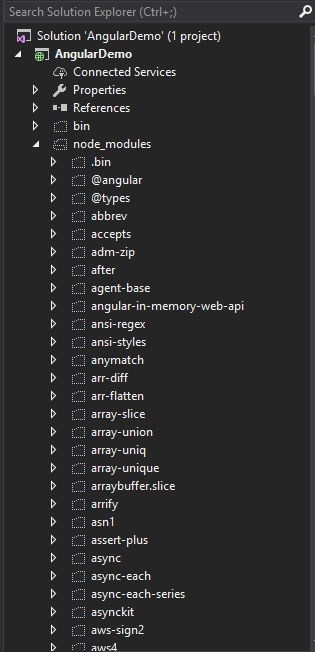
We don’t have to include the node modules in the project.Now the installation is completed and we can run the project using npm start but not through visual studio. In order to start the project with visual studio we need some more configurations to do. Notice that in the browser when we clicking F12 we have 404 not found errors for the following sites

  • styles.css
  • systemjs.config.js
  • main.js

All these files are present in “src” folder. So to fix these “404 Not Found” errors, in index.html file, change <base href=”/”> to <base href=”/src/”>

IndexFile.PNG

and we have to include “/” before node_modules

At this point reload the page and you will see “Hello Angular” message without any errors.

If you want Visual Studio to compile Typescript to JavaScript when the changes are saved, we need to turn this feature “ON” by including the following setting in tsconfig.json file

ComplieOnSave.PNG

Happy coding 🙂


Working with JsRender

JsRender is simple, lightweight but powerful templating engine. It is used for data-driven rendering of templates to strings, ready for insertion in the DOM. In the following example i am going to describe how JsRender  can be used with jQuery. When jQuery is present, JsRender loads as a jQuery plugin adds $.views, $.templates, $.render to the jQuery namespace object.

Loading JsRender with jQuery

This sample shows how the template renders against the data.

<div class="form-group">
<label for="selectState">State</label>
<select class="form-control" id="selectState">
</select>
</div>


In the html you see that we put our markup in a script block with type="text/x-jsrender"


<script id="StateOptionTemplate" type="text/x-jsrender">

<option value="{{:id}}">{{:value}}</option>
</script>

I am using typescript for writing the jQuery. So in my typescript file i have created a method for loading the states from the database. In the code we call the $.templates() method with a jQuery selector for that script block, to get the compiled template.


var myTemplate =$.templates("#StateOptionTemplate")

After that we run the code we have already seen to render the template against our data, and get the HTML output as a string.


var html = myTemplate.render(states);

Finally we simply insert that output into Html DOM using the jQuery html() method.


$("#" + selectState).html(html);


Happy coding 🙂 🙂 🙂

Creating Custom Forms in Outlook 2013

Outlook 2013 already have predefined set of template for users.This will save our valuable time and effort to draft an email. But sometimes we want to use our own email layout.If we find out that we are repeatedly drafting same message we can create our own template, save it and use it on our own.

The first step to the creation of an Outlook template is to enable the Developer tab in outlook.

File->Options->Customize Ribbon->Check the Developer check box->OK

customize-ribbon

Now we will be able to view the Developer tab on the ribbon.

developer-tab

We can create a custom form by modifying any of the default forms available.For that we have to choose any of the default form.We can either choose it from the Choose Form option in the Developer tab or from Home->New Items->More Items->Choose Form.

choose-form

We will be getting a list of default outlook templates from here.Select one of the templates from here and start designing on your own.For example I have selected Message template from Standard Form Library.We can start the designing by clicking Design This Form under Developer tab.

design-this-form With this I have created a sample form.We have the Field Chooser option to choose from the default fields available in outlook.There is also a tool box which contains label,text etc from which we can choose from.

sample-form

There is an option called Run this Form using this we can preview how our form will be displayed.If we are creating controls using Control Box and you would like the information in this control to be saved with the form, the control must be bound to a field. This means that a link will be established between the control and the source of data, in this case, a field in the item.

  1. In the Forms Designer, right-click the control you want to bind to a field and then click Properties on the shortcut menu.
  2. On the Value tab, click Choose Field, point to a field set, and then click the field to which you want to bind the control. If you would like to bind the control to a new field that you create, click New. In the New Field box, type the name of your new field in the Name: area. Click OK in the New Field box.
  3. Click OK


bind-value

Now the question is will I be able to get the email like this as a recipient? The answer is no because we have to create and edit separate compose and read versions for each page of a form. The compose version is the one that is displayed when we create an item. The read version is the one that Outlook displays after the item has been saved.For that we have to go to the Developer tab-> Select the tab on which we are designing our custom form->Select Page->Edit Read Page.

edit-read-page

So our Custom Form creation part is over.But how are we saving and using the forms? We have two options for this.

  1. Save as  template in the file system.
  2. Publish the Forms

Save as template in the file system:

When we are saving as a template the form will be saved in the default path “C:\Users\User Name\AppData\Roaming\Microsoft\Templates”.It is saved as a .oft file.

save-as-template

Publish the Forms:

Outlook forms can be published to three different types of form libraries:

  1. Personal Forms Library of forms stored in your Personal Folders or Exchange Server mailbox.
  2. Organizational Forms Library of forms stored on the Exchange Server for group use. You need permission from the Exchange Server administrator to publish to this library.
  3. Folder Forms Library of forms associated with a particular folder, either in your mailbox or Personal Folders or in a public folder on the Exchange Server.

publish-form

Removing a Custom Form:

To remove a published form in Outlook 2010 and up, choose File -> Options -> Advanced -> Custom Forms -> Manage Forms to access the Forms Manager dialog.

remove-form

Hope this helps 🙂

Recipient View of Custom Outlook Forms

We have already discussed about how to create, save, publish and remove custom forms in outlook in the previous blog.If you couldn’t read it please do visit Creating Custom Forms in Outlook 2013. Most of the people find it difficult to view the custom forms in recipient side.There are chances to get blank mail if we have not installed the form correctly in our machine.One of the solution which i could suggest is you have to copy the .oft file in the following location “C:\Users\UserName\AppData\Roaming\Microsoft\Templates”. Now you can take your custom template from outlook.It will be under the User Templates in File System.

user-template

Now we need to publish the corresponding file.When we publish this file it will be saved under Personal Forms Library.publish-template

Once the file is published it will become an .fdm file. Now we have installed our oft file in our machine.When we get an email with this template we will be able to open it with the corresponding template.